2 min read
基于Haar级联分类器的人脸检测
使用 Python 和 OpenCV 快速实现人脸检测。详细介绍了如何利用 Haar 级联分类器来检测图像中的人脸,并使用 Matplotlib 展示结果。
views
| comments
人脸检测是计算机视觉的入门砖。
1. 准备工作#
- libs
- opencv-python
- matplotlib
haarcascade_frontalface_default.xml↗- 本文中人脸检测的核心是 OpenCV 提供的 Haar 级联分类器。这是一种高效的目标检测方法,依赖于预先训练好的 XML 文件来识别图像中的人脸特征。
2. 人脸检测和可视化#

(Image credit: Mark Russinovich on LinkedIn. Source ↗.)
脚本使用 OpenCV,首先将图像加载为灰度图进行检测,并在彩色图像上绘制矩形,最后使用 Matplotlib 显示结果。
import cv2
import sys
import matplotlib.pyplot as plt

# 1. 配置路径
cascade_path = 'haarcascade_frontalface_default.xml'
image_path = 'faces.jpg'

# 2. 加载模型与图像
face_cascade = cv2.CascadeClassifier(cascade_path)

if face_cascade.empty():
    print(f"错误: 无法加载级联文件 {cascade_path}")
    sys.exit()

image = cv2.imread(image_path)
if image is None:
    print(f"错误: 无法加载图像 {image_path}")
    sys.exit()

# 3. 图像预处理
# OpenCV (BGR) 转 Matplotlib (RGB)
rgb_image = cv2.cvtColor(image, cv2.COLOR_BGR2RGB)
# 彩色图转灰度图,用于加速检测
gray_image = cv2.cvtColor(image, cv2.COLOR_BGR2GRAY)

# 4. 执行人脸检测
faces = face_cascade.detectMultiScale(
    gray_image,
    scaleFactor=1.1,  # 图像缩小比例
    minNeighbors=5,   # 每个检测框保留所需的最小邻居数
    minSize=(30, 30)  # 最小检测尺寸
)

# 5. 绘制矩形
# 在 RGB 图像上圈出检测到的人脸
for (x, y, w, h) in faces:
    cv2.rectangle(rgb_image, (x, y), (x + w, y + h), (0, 255, 0), 2)

# 6. 使用 Matplotlib 显示结果
plt.figure(figsize=(10, 8))
plt.imshow(rgb_image)
plt.title(f"Detected {len(faces)} Face(s)")
plt.axis('off')
plt.show()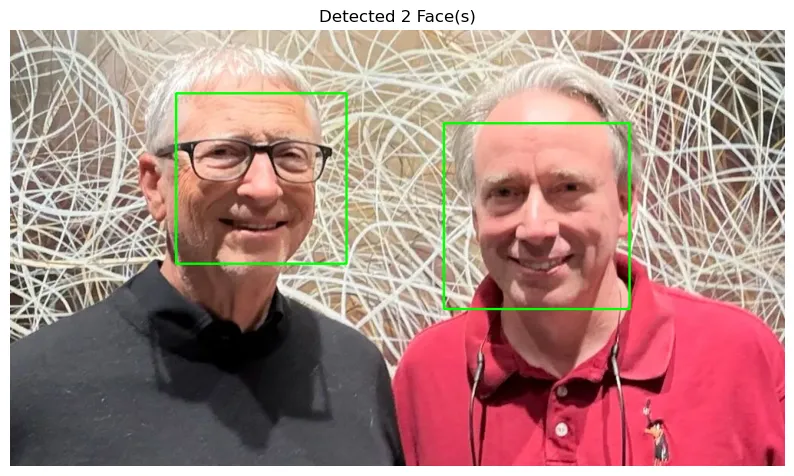
3. 备注#
- OpenCV 读取图像的默认颜色顺序是 BGR,而 Matplotlib 则是 RGB。
detectMultiScale是检测的核心。
scaleFactor: 越小,检测越精细,但速度越慢。minNeighbors: 越大,误报越少,但可能漏掉一些人脸。